Art & Random Thoughts - Sept 4, 2023
A city of another time, and more behind the scenes
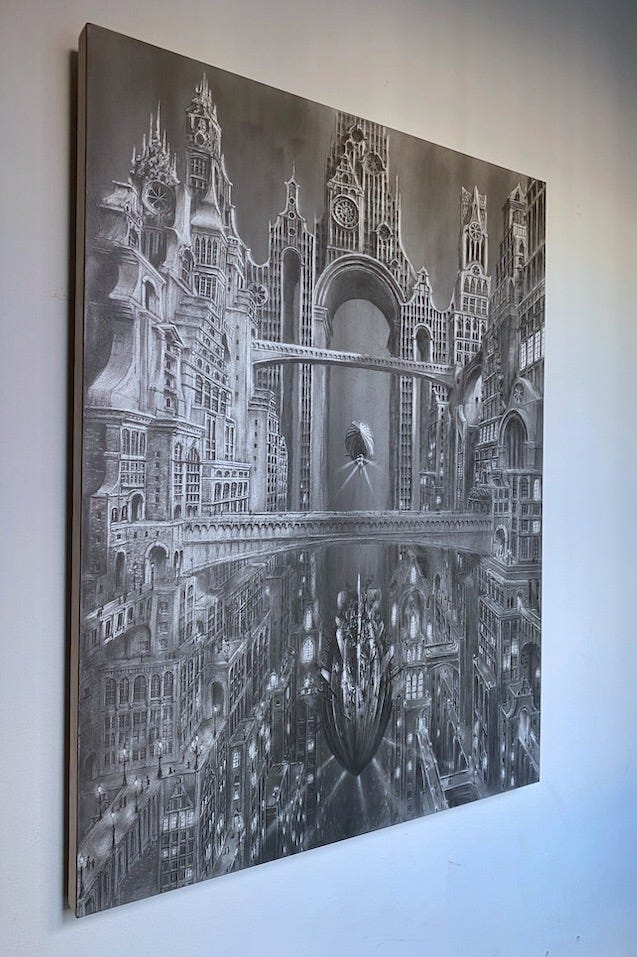
This week I finally finished a piece that’s kept me busy for most of August — “City of another time” — not really the future, and not really the past. Maybe an alternate future? Maybe another universe entirely? (Don’t ask me how I managed to get a glimpse of it). I took a few nuggets of inspiration from places like the film Metropolis and the drawings of Hugh Ferriss, and also some of the shapes and features of Flemish architecture (a style that I’ve often overlooked in my hunts for architectural inspiration, but which I’ve come to appreciate recently for its whimsical playfulness).
This piece was made with graphite on a 24 x 18 in. gesso board. The process for this was identical to how I made City of the Future — and so since I did it once before I was able to do this one in much more cavalier fashion (trust me, I looked cavalier doing this). It began with an outline on drafting paper, which I then traced onto tracing paper, which I then used like a piece of carbon paper to get the outline onto the board, cavalierly.
Prints of City of Another Time can be purchased here on Society6.
After a piece is finished…
I thought I’d share a few notes on some of the extra stuff that happens behind the scenes after I put the pencil and eraser down and call a piece done.
Fixative
Recently I’ve come to appreciate the benefits that a coat of fixative can have on a piece, especially a graphite drawing. With graphite, more than many other mediums, it’s very easy to muck up a piece when we’re handling it— graphite might smudge or rub off, or a rogue eraser could wipe a bunch of it away. A good coat of spray-on fixative prevents most of that, and also gives it some UV protection that could prevent it from fading under sunlight later on. I’ve been using Krylon’s matte low odor clear finish for this. One other big benefit of using fixative on graphite drawings is that it prevents the “reflectiveness” of graphite that you get when light hits it at certain angles. As a result, when you view the piece at any angle, the lights and darks will pop out a lot more and the piece will have a much smoother look to it.

Scanning
With a lot of my pieces I may just take a photo with my iPhone, share that to Instagram, and be done with it, but if I’m looking to get a digitized version of a piece for a high quality print, I’ll pull out the scanner.
The problem with a lot of pieces, (like City of Another Time) is that they don’t fit on a normal scanner. Large format scanners that can do 24x18+ inch pieces are incredibly expensive, so instead we have to scan in segments and stitch them together. Back in the day I used to do this with an old 12in scanner and some very careful manual stitching in photoshop— a process which took a few hours per piece.
These days I use a VIISAN 3120 17x12in scanner, which scans nice and quickly, and then PhotoStitcher, which takes care of all the stitching in just a few seconds.
One problem that can happen when scanning an oversized piece— especially if it’s something rigid like a panel, is that its impossible to get it fully flat and lined up on the scanner’s glass since the glass is often recessed below the plastic casing of the scanner. As a result you could end up with sections that are blurry or darker, or accidentally skewed at a slight angle.
One way to fix this is, instead of shifting the piece left→right, up→down to cover each section, just rotate it so that each corner gets a turn at the “alignment” corner of your scanner (usually there may be an arrow pointing to it). On each scan, make sure the piece is flush with the 2 sides of the scanning surface, and as you scan it, rotate the resulting digital images so they’re all “upright”. PhotoStitcher can then take these 4 parts and stitch them into a nice sharp, perfectly aligned, consistently lit image in cavalier fashion.

Thanks for reading! Prints of my pieces can be purchased at https://society6.com/chrisbeckerart


